


This sensor works with the DSC Impassa and compatible security systems.
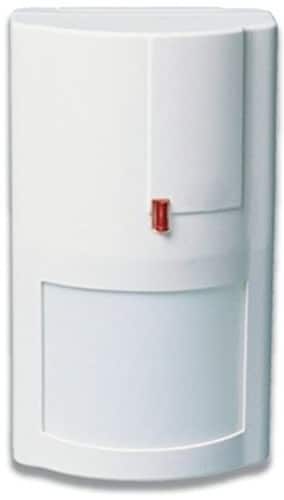
DSC Wireless Pet Immune Motion Detector
WS4904
Overview
The Wireless Pet Immune Motion Detector works with your DSC Security System, providing effective and reliable detection of human motion, combined with technology that can distinguish pets weighing up to 60 pounds. This easy-to-install device gives you an added layer of protection for your home and family while providing instant alerts with our Pulse mobile app.
Setup
If your Virtual Appointment has not been scheduled, please call (800) 493-7807. This product requires an ADT Virtual Agent to complete the connection of the sensor to your equipment. Your virtual agent will walk you through setting up your sensor.
Pre-Setup for Virtual Appointment
- Verify that you have everything you need to mount the detector:
- DSC Motion Sensor (included)
- Mounting hardware (included)
- Two screws (included)
- Battery- CR123A (included)
- Note: Do not insert the battery until you are told to do so by your ADT Virtual Agent.
- Drill with drill bits for pilot holes (not included)
- Phillips head screwdriver (not included)
- Your Virtual Agent will help you determine where to place your Motion Detector. The list below provides some examples of things to keep in mind when selecting an optimal location.
- The optimal range is obtained at a mounting height of 7’ 6” from the floor.
- For use in homes with pets:
- Mount with the center of the device at 7’ 6” from the floor.
- Mount where pet(s) cannot come within 6 feet of the sensor by climbing on furniture, stairs, boxes, or other objects.
- Allow a clear, unobstructed field of view for all areas to be protected.
- Do not have detector directly facing windows.
- Avoid proximity to moving machinery, fluorescent lights, and heating/cooling sources.
- Do not expose to air drafts.
- Do not install outdoors.
- Avoid installation in direct sunshine.
- Do not install behind partitions.
- Mount on a solid, stable surface.
- Select how you would like to mount your detector, either in a corner or flat against a wall. Keep in mind the backplate MUST be mounted to a stud, solid wood, or with a robust wall anchor. Your Virtual Agent will help you determine the best location.
Congratulations! You are ready for the next step. Our Virtual Agent will contact you at your appointment time to complete the installation. We will connect your sensor to your ADT Pulse System so that it can be monitored. The virtual agent will verify the following:
✔ All test signals have been received.
✔ Your new sensor is labeled correctly on your touchscreen and in your Control app.
✔ If desired, notification settings are enabled, and notifications are being received on your device.
✔ Teach you how to best use your new sensor.
Setting up your DSC Motion Detector
Your ADT Virtual Agent will guide you through the process of connecting this device to your system by walking you through adding it to your security system, help you determine where to place it, and walk you through mounting the Motion Detector in its final location.
Connecting to the System
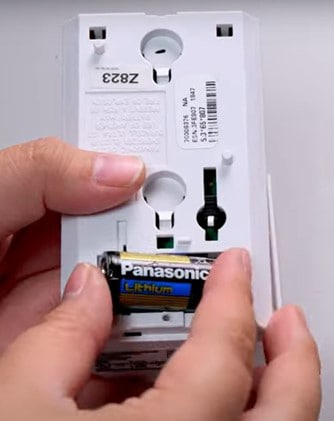
- Your Virtual Agent will advise you to insert the battery in the device.
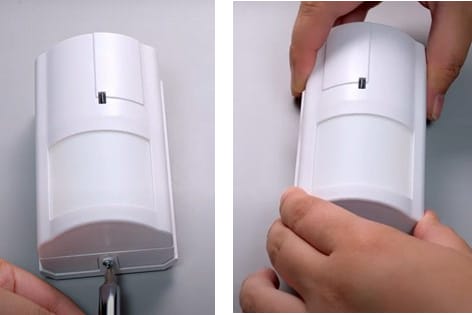
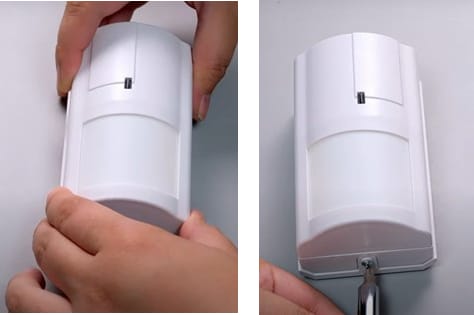
- To do this, open the sensor by detaching the front cover of the Motion Detector from its base.
- Using a Phillips-head screwdriver, remove the screw located at the bottom of the device, then slide it upward to remove it from the backing.
- Using a Phillips-head screwdriver, remove the screw located at the bottom of the device, then slide it upward to remove it from the backing.
- Then, insert the battery, observing the correct polarity. The red LED will illuminate on the front of the device.
- The Virtual Agent will then provide instructions on how to connect your device to the system at your panel.
Mounting the Detector
Your Virtual Agent will help you determine the best location for your Motion Detector.
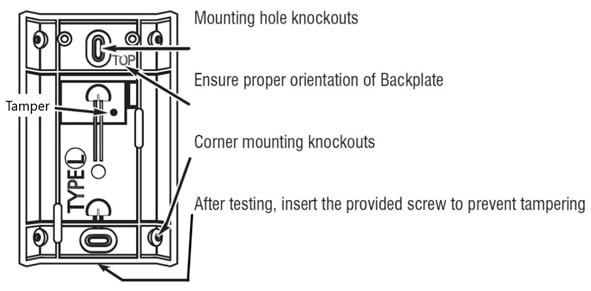
This detector can be mounted flat against the wall or in a corner. See image below for appropriate mounting holes.
Flat Mount
- Hold the backplate flat against the wall with the TOP pointed up and locate the two mounting hole knockouts in the center.
- Using the provided screws, attach the backplate to the wall.
- You may need to drill two 1/16” pilot holes for the screws.
- To mount the detector on the bracket:
- Be sure the detector is mounted right side up. The large inset should be at the bottom.
- Align the back of the detector on the mounted bracket.
- Then slide the detector down.
- Secure cover to base with bottom screw.
- Your ADT Virtual Agent will now test the system and confirm all signals have been received by the ADT Central Station.
Corner Mount
- Hold the backplate in the corner of two adjoining walls with the TOP pointed up; locate knockout holes and decide whether to use holes on the right or left.
- Using the provided screws, attach the backplate to the adjoining walls.
- You may need to drill two 1/16” pilot holes for the screws.
- To mount the detector on the bracket:
- Be sure the detector is mounted right side up. The large inset should be at the bottom.
- Align the back of the detector on the mounted bracket.
- Then slide the detector down.
- Secure cover to base with bottom screw.
- Your ADT Virtual Agent will now test the system and confirm all signals have been received by the ADT Central Station.
Features and Usage
Your DSC Motion Detector provides an added layer of security by making sure you know when there is unexpected motion in your room.
Features
Accurate Detection
The ability to distinguish between intruders and other disturbances, as well as humans and pets up to 60 pounds, ensures higher reliability and reduces false alarms.
Temperature Compensation
The detector adapts to changes in atmosphere to provide improved detection over a broad range of temperatures.
High-Traffic Shutdown
To prolong battery life, the detector will shut down for three minutes after motion is detected.
Usage
Alerts
To receive an alert when a door or window is opened, set up an alert in your Pulse web portal.
- Log onto your account in the Pulse web portal.
- Click Add Alert in the top right of Rules page.

- In the pop-up, choose When something happens and click OK.
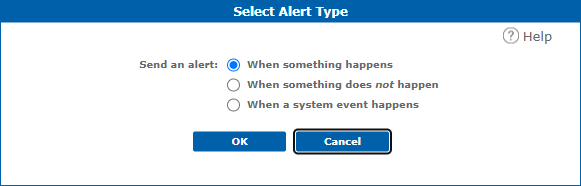
- Select your Motion Detector from the Triggers drop-down list. (The list of triggers will vary depending on what devices are installed).
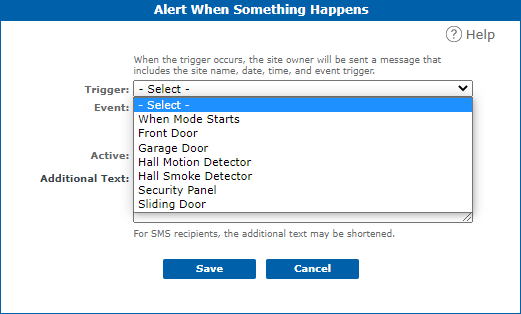
- Select Motion or No Motion from the Event drop-down list (based on the type of events your selected trigger can send).
- Then, select When event happens or At a Specific Time (for example, “at noon every day, send me an alert when motion happens”).
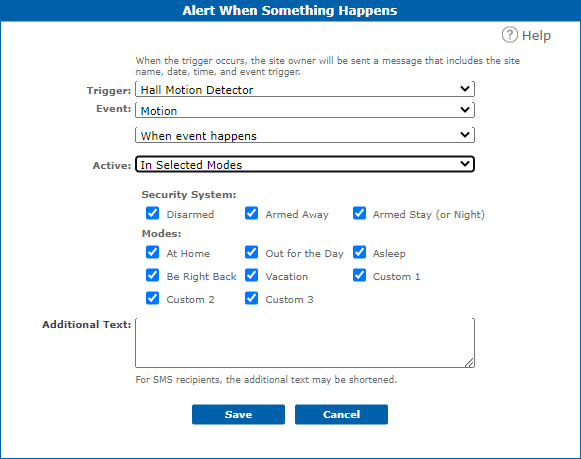
- From the Active drop-down list, select the conditions under which you want the alert to be sent.
- If you select In Selected Modes, you can specify in which security system states and modes the alert is to be sent. It is important to note that alerts will only be active when the system is in one of the selected security system states AND in one of the selected modes at a given time.
- If you select During Selected Times/Days, you can specify the times and days when the alert is to be sent. You can also select "Sunrise" or "Sunset", and the action will take place at the sunrise or sunset time base on your ZIP code. As sunrise and sunset times change throughout the year, the scheduled time will automatically adjust. You can also select an offset time up to 90 minutes before or after sunrise or sunset.
- If you select Always, the alert will always be active.
- Enter text in the Additional Text box to be included in the message with the alert, if desired.
- Click Save to finalize the selection.
Troubleshooting
False Alarms
To prevent false alarms, check the area within range of the motion detector for items or situations that could trip a motion detector and remove or correct if necessary.
For example:
- Pets, including fish tanks
- Fans
- Balloons
- Decorations
- Insects or cobwebs moving on the device
- Curtains moving from blowing air from air conditioning, heating, or open windows/doors
- Movement outside a window that is within the motion detector's field of view
- Movement outside a window causing moving shadows inside the room
Low Battery
A low battery message for the detector can appear on the panel.
- If you have recently changed the battery, verify that it was installed correctly. Refer to the Battery Replacement instructions below.
- If it has not been changed recently, it’s time to change the battery in the sensor. You will need one 3V CR123A battery.
- To obtain a new battery, you can do one of the following:
- Log on to MyADT.com and select Orders to place an order or order a battery through chat with an agent.
- Call (800) ADT-ASAP to order a battery.
- Purchase the battery from an online or local retailer.
- Follow the Battery Replacement instructions below. Once the battery has been replaced, the error message will no longer appear.
Battery Replacement
Battery Required: One 3V CR123A
To replace the battery:
- Log into MyADT.com and place your system on Test, or contact (800) ADT-ASAP to have an agent place the system on test for you.
- Using a Phillips-head screwdriver remove the screw located at the bottom of the detector, then slide it upward to remove it from the backing.
- Unscrew the battery cover.
- Your panel will show a tamper signal and beep; this is normal.

- Your panel will show a tamper signal and beep; this is normal.
- Remove the old battery.
- Insert the new battery, being sure to observe polarity.
- Replace screws, then slide the detector back onto the wall plate.
- Secure detector to plate with screw.
- After re-mounting the detector, go to the panel. Then, tap the icon in lower right corner, and enter your code (this process is done twice). This will clear the tamper message.
- Remove your system from test mode.
NOTE: Constant exposure to high or low temperatures or high humidity may reduce battery life.
BATTERY CAUTION: Risk of fire, explosion and burns. Do not recharge, disassemble, heat above 212° F (100° C) or incinerate. Dispose of used batteries properly. Keep away from children.
An ADT technician who will assist you during your call. The Virtual Agent will verify the following:
✔ All test signals have been received.
✔ Your new sensor is labeled correctly on your touchscreen and in your Pulse app.
✔ If desired, notification settings are enabled, and notifications are being received on your device.
✔ Teach you how to best use your new sensor.
The DSC Motion Detector is pet immune for pets up to 60 pounds. Additionally, your Virtual Agent can help you set the sensitivity levels of your motion detector based on the size of your pet, so the detector can sense unwanted visitors and not your pets.
Placement is a large part of the successful application for motion sensors. They work best when placed up high on the wall to cover a large amount of area. The best placement for a motion sensor is in a corner of the room that has a good viewpoint of your entryways and can easily detect any changes in the room.

