


This keyfob works with Command.
Command Keyfob
SiXFOB2A
Overview
This 4-button wireless Keyfob brings convenience and the added confidence of portable security to your ADT Command Security System, providing you with the ability to arm, disarm, send a panic signal—all accessible right at your fingertips.
Setup
If your Virtual Appointment has not been scheduled, please call (800) 493-7807. This product requires an ADT Virtual Agent to complete the connection of the keyfob to your equipment. Your virtual agent will walk you through setting up your keyfob.
Pre-Setup for Virtual Appointment
Verify that you have everything to setup your keyfob:
- Keyfob (included)
- One lithium 3V CR2032 battery (included)
Congratulations! You are ready for the next step. Our Virtual Agent will contact you at your appointment time to complete the programming. We will connect your keyfob to your ADT Command System. The virtual agent will verify the following:
✔ Test your keyfob.
✔ Teach you how to use your new keyfob.
Setting up your Keyfob
Your ADT Virtual Agent will walk you through connecting your Keyfob.
Connect to the System
- Ensure your system is disarmed.
- The Virtual Agent will then provide instructions on how to connect your device to the system at your panel.
- The Virtual Agent will then walk you through testing the Keyfob.
Features and Usage
Your ADT Keyfob gives you convenient, one-touch access for arming and disarming your system.
Features
Easy to use
Simple buttons with easy-to-understand icons help reduce false alarms and make it easy to arm or disarm your system.
Panic button
If you ever feel you are in danger at home, you can press the panic button to alert ADT monitoring centers to contact local emergency services for help.
Low battery alerts
You will receive an alert on your panel when it is time to replace your battery.
Usage
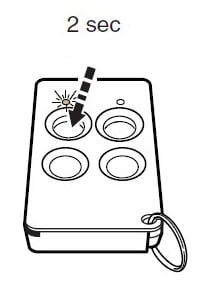
To activate, press and hold the appropriate button for approximately two seconds. The LED lights located above the top two buttons will confirm that a signal has been sent to the Command panel.
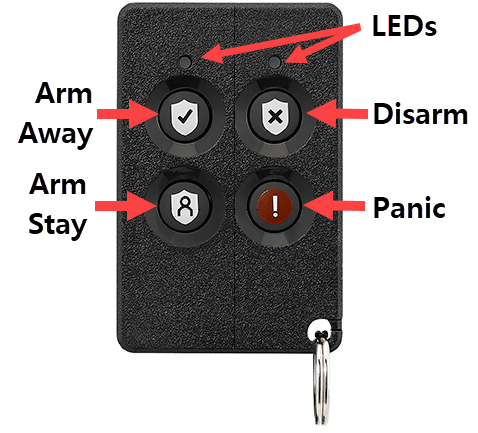
Away Arming
To Arm Away, press and hold the top-left button (Shield with Checkmark) until you see both LED lights flash green to indicate the signal was sent, then red to indicate that the panel successfully received the signal, followed by two beeps from the Keyfob. The audible exit countdown will then begin at the panel.
- Both the interior and exterior zones will be armed, allowing you to exit the premises.
Stay Arming
To Arm Stay, press and hold the bottom-left button (Shield with Person) until you see both LED lights flash green to indicate the signal was sent, then red to indicate that the panel successfully received the signal, followed by two beeps from the Keyfob. The silent exit countdown will begin at the panel.
- All perimeter zones, such as all windows and door contacts, will be armed. The interior zones will remain inactive, allowing you to stay on the premises without setting off an alarm.
Disarming
To Disarm, press and hold the top-right button (Shield with “x”) until you see both LED lights flash green to indicate the signal was sent, then green again to indicate that the panel successfully received the signal, followed by one beep from the Keyfob.
Panic Signaling
To use the Panic button, press and hold the bottom two buttons (Shield with Person and Red Button with “!”) until you see both LED lights flash green to indicate the signal was sent, then three red flashes to indicate that the panel successfully received the signal, followed by four beeps from the Keyfob. The alarm siren will sound. Use the Disarm button to cancel the alarm.
- Note: The Panic button can be programmed as a silent alarm by the Virtual Agent. In this case, when a Panic silent alarm is pressed, there will be no beeps and the alarm siren will not sound.
Troubleshooting
Low Battery
When the battery is low, the LEDs do not flash when the buttons are pressed
A low battery message for the Keyfob can appear on the touchscreen or touchpad, and in the Control app.
- If you have recently changed the battery, verify that it was installed correctly. Refer to the Battery Replacement instructions below.
- If it has not been changed recently, it’s time to change the battery in the keyfob. You will need one CR 2032 battery.
- You can purchase the battery from an online or local retailer.
- Follow the Battery Replacement instructions below. Once the battery has been replaced, the error message will no longer appear.If you have recently changed the battery, verify that it was installed correctly. Refer to the Battery Replacement instructions below.
Battery Replacement
Battery Required: One 3V CR2032
To replace the battery:
- Log into MyADT.com and place your system on Test, or contact (800) ADT-ASAP to have an agent place the system on test for you.
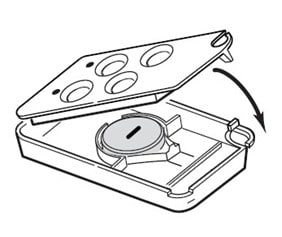
- Remove the screw from the back housing and use a screwdriver to gently separate the front and back housings.
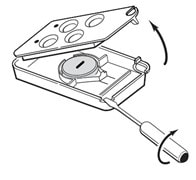
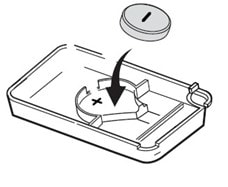
- Use a screwdriver to carefully remove the battery.
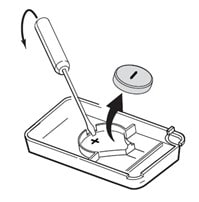
- Wait 10 seconds or press a Keyfob button for 2 seconds to ensure full power discharge.
- Insert a new battery as shown, with positive side down.
- Replace the front housing and secure the housings with the cover screw.
- Verify you can arm/disarm the system by pressing the buttons on the keyfob.
- Remove the system from Test mode.
NOTE: Constant exposure to high or low temperatures or high humidity may reduce battery life.
BATTERY CAUTION: Risk of fire, explosion and burns. Do not recharge, disassemble, heat above 212° F (100° C) or incinerate. Dispose of used batteries properly. Keep away from children.
An ADT technician who will assist you during your call. The Virtual Agent will verify the following:
✔ Test your Keyfob.
✔Teach you how to use your new Keyfob.

